Enable SR-IOV on OCP VM
Important
These instructions assume the virtual functions are configured. If not see Enable SR-IOV on RHEL/KVM
Prerequisites
Add VF’s to each node. This can be done pre or post Node-VM deployment.

SSH to one of the nodes with VF’s assigned
ssh core@<nodeIP>Run
lspci -vnnlook for output similar to the following.
Hint
In the example output above, the PCI Device ID is “8086:1520” and the Kernel Module is “igbvf”. This information will be required in the next section.
Simple script to list devices. Copy and paste the following to a local file. Be sure to “chmod +x <file_name>”.
#!/bin/bash

NET_ROOT="/sys/class/net"

for i in $(ls $NET_ROOT/) ; do
    if [ "$i" != "idrac" ] && [ -d $NET_ROOT/$i/device ]; then
        source $NET_ROOT/$i/device/uevent;
        SPEED=$(cat $NET_ROOT/$i/speed);
        STATE=$(cat $NET_ROOT/$i/operstate) ;
        NIC_NAME=$(lspci | grep  ${PCI_SLOT_NAME#*:} | awk -F ":" '{print $NF}')
        echo -e "\"$HOSTNAME\", \"$i\", \"$NIC_NAME\", \"$STATE\", \"${PCI_ID%%:*}\", \"${PCI_ID#*:}\", \"$PCI_
    fi;
done
Prepare Hosts
Attention
Worker nodes with SRIOV VF’s passed into them need to have a machineconfig applied to them. Nodes will reboot
Create
100-worker-sriov-blacklist.yaml. Replace Kernel Module identified in the previos section.apiVersion: machineconfiguration.openshift.io/v1 kind: MachineConfig metadata: labels: machineconfiguration.openshift.io/role: worker name: 100-worker-blacklist spec: config: ignition: version: 3.2.0 kernelArguments: - modprobe.blacklist=igbvf
Create “100-worker-sriov-blacklist.yaml”
oc create -f 100-worker-sriov-blacklist.yaml
Caution
Wait for “worker” nodes to apply and reboot before next step. Verify with
oc get nodesandoc get mcpCreate
100-worker-vfiopci.bu. Replace PCI Device ID identified in the previous section. Update OCP version as well.variant: openshift version: 4.12.0 metadata: name: 100-worker-vfiopci labels: machineconfiguration.openshift.io/role: worker storage: files: - path: /etc/modprobe.d/vfio.conf mode: 0644 overwrite: true contents: inline: | options vfio-pci ids=8086:1520 options vfio enable_unsafe_noiommu_mode=1 - path: /etc/modules-load.d/vfio-pci.conf mode: 0644 overwrite: true contents: inline: vfio-pci
Danger
100-worker-vfiopci.bu will be applying the setting “enable_unsafe_noiommu_mode=1” which is required to make vfio_pci work on a virtual machine that does not have IOMMU available. Since no-IOMMU mode forgoes IOMMU protection, it is inherently unsafe.
Run
butane 100-worker-vfiopci.bu -o 100-worker-vfiopci.yamlNote
If needed “butane” can be downloaded here:
https://mirror.openshift.com/pub/openshift-v4/amd64/clients/butane/latest/butane
Run
oc apply -f 100-worker-vfiopci.yamlCaution
Wait for “worker” nodes to apply and reboot before next step. Verify with
oc get nodesandoc get mcp
Alternative MCP Setup
If you do not want to apply the MachineConfigs to all “worker” nodes, create a new MachineConfigPool and label your nodes.
Note
In my lab I have two worker nodes and configured Vf’s for both. This section shows a method to segregate workers based on abilities.
Create MachineConfigPool
sriov_machineConfig_pool.yamland runoc create -f sriov_machineConfig_pool.yamlapiVersion: machineconfiguration.openshift.io/v1 kind: MachineConfigPool metadata: name: sriov labels: machineconfiguration.openshift.io/role: sriov pools.operator.machineconfiguration.openshift.io/sriov: "" spec: machineConfigSelector: matchExpressions: - {key: machineconfiguration.openshift.io/role, operator: In, values: [worker,sriov]} nodeSelector: matchLabels: node-role.kubernetes.io/sriov: "" pause: false
Label your nodes.
oc label node/<nodeName> node-role.kubernetes.io/sriov=
Then update the
100-worker-blacklist.yamland100-worker-vfiopci.bufile replacing “machineconfiguration.openshift.io/role: worker” with “machineconfiguration.openshift.io/role: sriov”
Install SRIOV Network Device Plugin
Create a new namespace for the device plugin to run from
oc new-project sriovdpCreate
serviceaccount.yamland deployoc create -f serviceaccount.yamlapiVersion: v1 kind: ServiceAccount metadata: name: sriov-device-plugin namespace: sriovdp
Give the service account scc priveldges
oc adm policy add-scc-to-user privileged -z sriov-device-pluginCreate
configmap.yaml, update to match your devices, and deployoc create -f configmap.yamlapiVersion: v1 kind: ConfigMap metadata: name: sriovdp-config namespace: sriovdp data: config.json: | { "resourceList": [ { "resourceName": "intel_sriov_dpdk", "selectors": { "vendors": ["8086"], "devices": ["1520"], "drivers": ["vfio-pci"] } } ] }
Create
sriov-daemonset.yamland deployoc create -f sriov-daemonset.yamlapiVersion: apps/v1 kind: DaemonSet metadata: name: kube-sriov-device-plugin-amd64 namespace: sriovdp labels: tier: node app: sriovdp spec: selector: matchLabels: name: sriov-device-plugin template: metadata: labels: name: sriov-device-plugin tier: node app: sriovdp spec: hostNetwork: true nodeSelector: kubernetes.io/arch: amd64 serviceAccountName: sriov-device-plugin containers: - name: kube-sriovdp image: quay.io/openshift/origin-sriov-network-device-plugin:4.12 imagePullPolicy: IfNotPresent args: - --log-dir=sriovdp - --log-level=10 securityContext: privileged: true resources: requests: cpu: "250m" memory: "40Mi" limits: cpu: 1 memory: "200Mi" volumeMounts: - name: devicesock mountPath: /var/lib/kubelet/ readOnly: false - name: log mountPath: /var/log - name: config-volume mountPath: /etc/pcidp - name: device-info mountPath: /var/run/k8s.cni.cncf.io/devinfo/dp volumes: - name: devicesock hostPath: path: /var/lib/kubelet/ - name: log hostPath: path: /var/log - name: device-info hostPath: path: /var/run/k8s.cni.cncf.io/devinfo/dp type: DirectoryOrCreate - name: config-volume configMap: name: sriovdp-config items: - key: config.json path: config.json
Check the output from the sriov-daemonset with,
oc logs ds/kube-sriov-device-plugin-amd64If the plugin correctly deployed, you should see something similar to the following.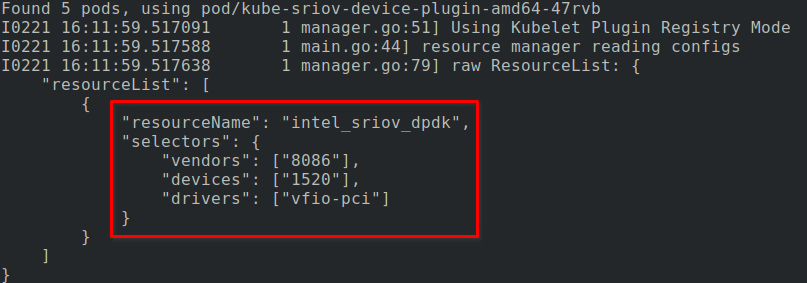

Attention
Be sure this working properly before next section.
Test SRIOV Device Plugin
Tip
My test example below creates all objects in the “sriovdp” project. Any project is acceptable but requires a “NetworkAttachmentDefinition” in that NameSpace.
Create NetworkAttachmentDefinition
sriov-net.yamland runoc create -f sriov_machineConfig_pool.yamlSee also
For more information on multiple networks and config types go to: Understanding multiple networks
apiVersion: "k8s.cni.cncf.io/v1"
kind: NetworkAttachmentDefinition
metadata:
  name: sriov-net
  annotations:
    k8s.v1.cni.cncf.io/resourceName: intel.com/intel_sriov_dpdk
spec:
  config: '{
  "type": "macvlan",
  "cniVersion": "0.3.1",
  "name": "sriov-net",
  "ipam": {
    "type": "host-local",
    "subnet": "10.56.217.0/24",
    "routes": [{
      "dst": "0.0.0.0/0"
    }],
    "gateway": "10.56.217.1"
  }
}'
Create pod
test-pod1.yamlwith attached interface,oc create -f test-pod1.yamlapiVersion: v1 kind: Pod metadata: annotations: k8s.v1.cni.cncf.io/networks: '[ { "name": "sriov-net", "namespace": "sriovdp" } ]' labels: env: test name: testpod namespace: sriovdp spec: containers: - name: appcntr1 image: centos/tools imagePullPolicy: IfNotPresent command: [ "/bin/bash", "-c", "--" ] args: [ "while true; do sleep 300000; done;" ] resources: requests: intel.com/intel_sriov_dpdk: '1' limits: intel.com/intel_sriov_dpdk: '1' restartPolicy: "Never"
Confirm test-pod1 attached interface.
oc describe pod/testpod1

Tip
Create additional test pods and verify network connectivty by connecting to each pod and pinging peer.
oc exec -it pod/testpod2 -- bash