OpenShift Day 2
Get deployment and management tools
Set environment/version
OCP_VERSION=4.20.0
Get install tool
curl -L -k https://mirror.openshift.com/pub/openshift-v4/clients/ocp/$OCP_VERSION/openshift-install-linux.tar.gz \
-o openshift-install-linux-$OCP_VERSION.tar.gz
Get client tool
curl -L -k https://mirror.openshift.com/pub/openshift-v4/clients/ocp/$OCP_VERSION/openshift-client-linux.tar.gz \
-o openshift-client-linux-$OCP_VERSION.tar.gz
Get butane
curl -L -k https://mirror.openshift.com/pub/openshift-v4/amd64/clients/butane/latest/butane \
-o butane
Download pull secret by browsing to following url https://console.redhat.com/openshift/install/pull-secret
Privileged Deployment (root)
By default all deployed application pods run as nonroot. For LAB/PoC testing the following procedure allows root privileges on a per project and deployment basis.
Attention
For security reasons it’s recommended to run as nonroot (default) and update your container to work in this security context.
Option 1
Use the “scc-subject-review” subcommand to list all the security context constraints that can overcome the limitations that hinder the container.
oc get deployment <deployment-name> -o yaml -n <project> | \
  oc adm policy scc-subject-review -f -
Create a service account in the namespace of your container.
oc create serviceaccount <service-account-name> -n <project>
Associate the service account with an SCC
oc adm policy add-scc-to-user <scc-name> -z <service-account-name> \
  -n <project>
Update existing deployment with newly created service account
oc set serviceaccount deployment/<deployment-name> \
  <service-account-name> -n <project>
Option 2
Update the “privileged” Security Context Constraints by adding the projects “default” service account.
oc edit scc privileged
Note
You can apply this to any project and any service account in use with the deployment. In the following example we’re using the “default” project and the “default” service account.
users:
- system:admin
- system:serviceaccount:openshift-infra:build-controller
- system:serviceaccount:default:default
Update deployment. The following deployment highlights the required changes.
apiVersion: apps/v1
kind: Deployment
metadata:
  name: f5-hello-world-web
  namespace: default
spec:
  replicas: 2
  selector:
    matchLabels:
      app: f5-hello-world-web
  template:
    metadata:
      labels:
        app: f5-hello-world-web
    spec:
      serviceAccountName: default
      containers:
      - env:
        - name: service_name
          value: f5-hello-world-web
        image: mirror.lab.local:8443/f5devcentral/f5-hello-world:latest
        imagePullPolicy: IfNotPresent
        name: f5-hello-world-web
        securityContext:
          runAsUser: 0
          privileged: true
          allowPrivilegeEscalation: true
          runAsNonRoot: false
          seccompProfile:
            type: RuntimeDefault
          capabilities:
            drop: ["ALL"]
        ports:
        - containerPort: 8080
          protocol: TCP
Managing CLI Profiles
The ability to manage multiple clusters via the CLI is possible with “oc config”. Here’s an example of my “~/.kube/config” file.
Note
All the required certs will be found in the kubeconfig file for each cluster.
Use the following template. Copy to “~/.kube/config” on your client.
apiVersion: v1
clusters:
- cluster:
    certificate-authority-data: <add_clusterCert>
    server: https://api.ocp1.lab.local:6443
  name: ocp1
- cluster:
    certificate-authority-data: <add_clusterCert>
    server: https://api.ocp2.lab.local:6443
  name: ocp2
- cluster:
    certificate-authority-data: <add_clusterCert>
    server: https://api.ocp3.lab.local:6443
  name: ocp3
- cluster:
    certificate-authority-data: <add_clusterCert>
    server: https://api.ocp4.lab.local:6443
  name: ocp4
contexts:
- context:
    cluster: ocp1
    user: admin/ocp1
  name: ocp1
- context:
    cluster: ocp2
    user: admin/ocp2
  name: ocp2
- context:
    cluster: ocp3
    user: admin/ocp3
  name: ocp3
- context:
    cluster: ocp4
    user: admin/ocp4
  name: ocp4
current-context: ocp3
kind: Config
preferences: {}
users:
- name: admin/ocp1
  user:
    client-certificate-data: <add_clientCert>
    client-key-data: <add_clientKey>
- name: admin/ocp2
  user:
    client-certificate-data: <add_clientCert>
    client-key-data: <add_clientKey>
- name: admin/ocp3
  user:
    client-certificate-data: <add_clientCert>
    client-key-data: <add_clientKey>
- name: admin/ocp4
  user:
    client-certificate-data: <add_clientCert>
    client-key-data: <add_clientKey>
Now we can view the available clusters.
oc config get-contexts
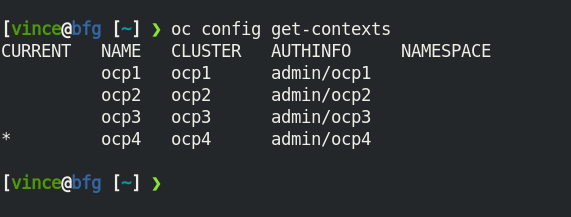
Set the cluster context to the cluster you want to manage.
oc config use-context ocp4
Schedule Control Nodes
Enable
oc patch schedulers.config.openshift.io/cluster --type merge \
  --patch '{"spec":{"mastersSchedulable":true}}'
Disable
oc patch schedulers.config.openshift.io/cluster --type merge \
  --patch '{"spec":{"mastersSchedulable":false}}'
Pause MCP
When making several changes via MCP it’s beneficial to “pause” MCP from restarting the nodes with each change. This way all changes are applied with a single reboot. Set “paused” to “true”, when finished set back to “false”.
oc patch mcp master --type merge --patch '{"spec": {"paused": true}}'
Force MCP to Update
If MCP gets stuck try forcing the update to unstuck it.
Create file called “machine-config-daemon-force” in “/run”
ssh core@host11 sudo touch /run/machine-config-daemon-force
Edit node annotations
oc edit node host11
Should look something like the following. Make change and “:wq”.
machineconfiguration.openshift.io/currentConfig: rendered-master-ed7befb1b258658c68e892964bbcf9e1
machineconfiguration.openshift.io/desiredConfig: rendered-master-ed7befb1b258658c68e892964bbcf9e1
machineconfiguration.openshift.io/reason: ""
machineconfiguration.openshift.io/state: Done
If needed reboot node. Typically node will automatically reboot but if not run following command.
ssh core@host11 sudo reboot
MCP and Performance Profile
In a cluster it’s typical to see different machine types running. By default the cluster has two machine config pools(MCP) , “master” and “worker”. When applying a performance profile, they are machine specific, and applied to the nodes in an MCP. In order to support this a new MCP needs to be created for each machine type.
Tip
Simultaneously upgrade multiple nodes. The default is one at a time.
oc patch mcp worker --type merge --patch '{"spec": {"maxUnavailable": 2}}'
Create new MCP yaml file
Important
Be sure to include “worker” in the “matchExpressions” section.
apiVersion: machineconfiguration.openshift.io/v1
kind: MachineConfigPool
metadata:
  name: small
  labels:
    machineconfiguration.openshift.io/role: small
    pools.operator.machineconfiguration.openshift.io/small: ""
spec:
  machineConfigSelector:
    matchExpressions:
      - {key: machineconfiguration.openshift.io/role, operator: In, values: [worker,small]}
  nodeSelector:
    matchLabels:
      node-role.kubernetes.io/small: ""
  pause: false
Create new MCP
oc create -f mcp-small.yaml
Verify new MCP
Attention
The new pool will be there with no members (MACHINECOUNT = 0)
oc get mcp
Add node to MCP by adding label, in my case “small” as defined in step 1
oc label node host24 node-role.kubernetes.io/small=
Verify MCP now includes the node with the proper label
oc get mcp
Reference MCP in Performance Profile
apiVersion: performance.openshift.io/v2
kind: PerformanceProfile
metadata:
  name: performance-small
spec:
  cpu:
    isolated: 1-7
    reserved: 0-0
  machineConfigPoolSelector:
    pools.operator.machineconfiguration.openshift.io/small: ""
  nodeSelector:
    node-role.kubernetes.io/small: ""
  numa:
    topologyPolicy: single-numa-node
  hugepages:
    defaultHugepagesSize: "2M"
    pages:
      - count: 1024
        node: 0
        size: 2M
  additionalKernelArgs:
    - "default_hugepagesz=2M"
    - "hugepagesz=2M"
    - "hugepages=1024"
  realTimeKernel:
    enabled: false
  workloadHints:
    highPowerConsumption: false
    perPodPowerManagement: false
    realTime: false
  net:
    userLevelNetworking: true
    devices:
      - interfaceName: “enp1s0”
      - interfaceName: “ens2s0”
Check allocated huge pages and kernel args
ssh core@host44 grep -i hugepages /proc/meminfo

# and/or

ssh core@host44 cat /boot/loader/entries/ostree-1-rhcos.conf

# and/or

ssh core@host44 cat /proc/cmdline
Stuck Terminating
Sometimes when deleting an object it can get stuck in the “Terminating” phase. The following command will remove it:
PVC Example
oc patch pvc <PVC_NAME> -p '{"metadata":{"finalizers":null}}'
BMH Example
oc patch bmh <BMH_NAME> --type merge --patch '{"metadata":{"finalizers":null}}'
Tip
for-loop-example
for i in $(oc get bmh | grep -v NAME | awk '{print $1}'); do oc patch bmh $i \
  --type merge --patch '{"metadata":{"finalizers":null}}'; done
Start toolbox (node)
There’s a script to start “toolbox” on each node. Toolbox is a container which has several network tools to help troubleshoot the cluster/node.
To start, SSH to node and run the following cmd:
toolbox
To start an alternative toolbox image, create file “~/.toolboxrc” on the target node with the following content. In this example I’m using my local registry.
cat << EOF > ./.toolboxrc
REGISTRY=mirror.lab.local:8443
IMAGE=rhel10/support-tools:latest
#IMAGE=centos/tools:latest
EOF
Configure an htpasswd Identity Provider
After configuring local storage and a PVC for the local registry, you may require an Identity Provider. These steps will get you started with htpasswd.
Attention
I’ve noticed without this, access to the local registry doesn’t work.
Create your flat file with a user name and hashed password.
htpasswd -c -B -b </path/to/users.htpasswd> <user_name> <password>
Add or delete users as needed.
ADD
htpasswd -B -b </path/to/users.htpasswd> <user_name> <password>
DELETE
htpasswd -D users.htpasswd <username>
From the OCP console create the HTPasswd identity provider.
Go to and click the Configuration tab
Filter the list for “oath”. Click the “OAuth” resource
In the “Identity providers” section click “Add” and select “HTPasswd”
Give the new object a unique name
Click “Browse” and upload the file created earlier
Click “Add”
Update the htpasswd identity provider.
Get the htpasswd secret name.
Attention
I’m assuming you have one htpasswd identity provider.
HTPASSWD=`oc get secret -n openshift-config | grep htpasswd | awk '{print $1}'`
Get/copy current htpasswd secret to local file.
Note
You can skip this step and simply edit the file created in step 1.
oc get secret $HTPASSWD -n openshift-config -ojsonpath={.data.htpasswd} | base64 --decode > users.htpasswd
Add or delete users (see step 2).
Update htpasswd secret.
oc create secret generic $HTPASSWD -n openshift-config --from-file=htpasswd=users.htpasswd --dry-run=client -o yaml | oc replace -f -
Important
If you remove a user from htpasswd you must manually remove the user resources from OCP.
oc delete user <username>

#AND

oc delete identity <identity_provider>:<username>
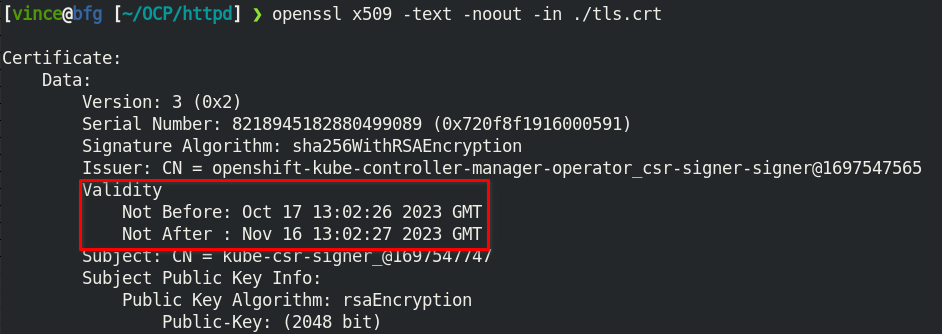
OCP Cert Expiry and Resolution
In the event that oauth is down, indicated by “connection refused” running any OC command against the API. The issue is most likely caused by an expired internal cluster certificate. Internal cluster certs have an expiry of 30d. Under normal circumstances these certs are auto renewed. By running the following commands you can confirm expired certs and resolve the issue.
SSH to any master node.
ssh core@master1
sudo -i
Export recovery KUBECONFIG for local cluster management.
export KUBECONFIG=/etc/kubernetes/static-pod-resources/kube-apiserver-certs/secrets/node-kubeconfigs/localhost-recovery.kubeconfig
View pending CSR’s (should see several in the pending state).
oc get csr
Approve all CSR’s.
oc get csr -o go-template='{{range .items}}{{if not .status}}{{.metadata.name}}{{"\n"}}{{end}}{{end}}' | \
  xargs --no-run-if-empty oc adm certificate approve
Important
Repeat this step until all pending CSR’s are approved!
To view the certs expiry date, extract the secret/csr-signer cert and key.
oc extract secret/csr-signer -n openshift-kube-controller-manager --to ./ --confirm

openssl x509 -text -noout -in ./tls.crt
Tip
To automate this you can use the following machine config:
kind: MachineConfig
apiVersion: machineconfiguration.openshift.io/v1
metadata:
  name: master-certificate-approve-systemd-service
  labels:
    machineconfiguration.openshift.io/role: master
spec:
  config:
    ignition:
      version: 3.2.0
    systemd:
      units:
      - name: csr-approve.service
        enabled: true
        contents: |
          [Unit]
          Description=This script approves pending certificates
          [Service]
          ExecStart=/etc/scripts/csr-approve.sh
          [Install]
          WantedBy=multi-user.target
      - name: csr-approve.timer
        enabled: true
        contents: |
          [Unit]
          Description=Run csr-approve.service every 5 minutes
          [Timer]
          OnCalendar=*:0/5
          Unit=csr-approve.service
          [Install]
          WantedBy=timers.target
    storage:
      files:
      - filesystem: root
        path: "/etc/scripts/csr-approve.sh"
        contents:
          source: data:text/plain;charset=utf-8;base64,IyEvYmluL2Jhc2gKZXhwb3J0IEtVQkVDT05GSUc9L2V0Yy9rdWJlcm5ldGVzL3N0YXRpYy1wb2QtcmVzb3VyY2VzL2t1YmUtYXBpc2VydmVyLWNlcnRzL3NlY3JldHMvbm9kZS1rdWJlY29uZmlncy9sYi1pbnQua3ViZWNvbmZpZwpvYyBnZXQgY3NyIC1vIGdvLXRlbXBsYXRlPSd7e3JhbmdlIC5pdGVtc319e3tpZiBub3QgLnN0YXR1c319e3subWV0YWRhdGEubmFtZX19e3siXG4ifX17e2VuZH19e3tlbmR9fScgfCB4YXJncyAtLW5vLXJ1bi1pZi1lbXB0eSBvYyBhZG0gY2VydGlmaWNhdGUgYXBwcm92ZSAyPiYx
          verification: {}
        mode: 0755
        overwrite: true
KubeletConfig podPidsLimit
In some cases the deafult 4096 is not enough. Adding this example as the solution doc example has mis-aligned yaml.
Use the following yaml to set the new “podPidsLimit”
apiVersion: machineconfiguration.openshift.io/v1
kind: KubeletConfig
metadata:
  name: set-pid-limit-kubelet
spec:
  machineConfigPoolSelector:
    matchLabels:
      pools.operator.machineconfiguration.openshift.io/worker: ''
  kubeletConfig:
    podPidsLimit: 8192
Note
This will casue MCP to Update and reboot each node in the designated machine config pool.
Confirm new limit is in place.
ssh core@host33 cat /etc/kubernetes/kubelet.conf | grep -i podPidsLimit
Append or Delete kernel argument
I have run into issues where an argument needs to be manually added back to the node to satisfy MCP. The following walks through the process.
Note
This is taken directly from the following solution doc:
How to add or remove kernel argument from RHCOS node in RHOCP 4
Cordon node
oc adm cordon <node1>
Drain node
oc adm drain <node1> --ignore-daemonsets --delete-emptydir-data
SSH to node
ssh core@<node1>Check kernel arguments
sudo rpm-ostree kargs
Append or delete kernel arguments
APPEND:
sudo rpm-ostree kargs --append='<key>=<value>'
DELETE:
sudo rpm-ostree kargs --delete <key>=<value>
Confirm kernel argument changes
sudo rpm-ostree kargs
When satisfied uncordon node
oc adm uncordon <node1>
Change Cluster Network MTU
It’s possible to change the interface MTU post deployment but I recommend getting this right at install time. The following is based on: Changing the MTU for the cluster network
Note
In the OCP doc they use a machine config to change the nodes interface MTU. I found this did NOT work. I simply used nmcli to change the value.
Important
This is for OVN-kubernetes only. For OpenShift SDN see official documentation.
Attention
Tested with 4.12
Confirm current MTU, see “Status” section.
oc describe network.config cluster
OUTPUTStatus: Cluster Network: Cidr: 10.128.0.0/14 Host Prefix: 23 Cluster Network MTU: 1400 Network Type: OVNKubernetes Service Network: 172.30.0.0/16
Confirm primary interace, in my example it’s “enp1so.122”.
Note
Check all interfaces. They should be the same but confirm.
ssh core@host51 nmcli -g connection.interface-name c show ovs-if-phys0
Update the network interface MTU. The type of interface will dictate where to make the change. In my example I use VLAN interfaces so will need to change the parent ethernet interface. It doesn’t hurt to change both but vlan interfaces inherit this setting from the parent.
Attention
Be sure to update all the “master” nodes.
ssh core@host51

sudo nmcli con modify enp1s0 ethernet.mtu 9000
sudo nmcli device reapply enp1s0
Start the MTU update
Note
In my example we’re going from 1400 to 8900. OVN requires 100 bytes of padding. The interface will be set to 9000.
Attention
This will cause each node to reboot via the machine config process. Be sure to let this process finish before proceeding.
oc patch Network.operator.openshift.io cluster --type merge \
  --patch '{"spec": { "migration": { "mtu": { "network": { "from": 1400, "to": 8900 } , "machine": { "to" : 9000 } } } } }'
Verify MCP has completed its changes via “watch”.
watch "oc get nodes; echo; oc get mcp"
Verify cluster MTU update.
oc describe network.config cluster
OUTPUTStatus: Cluster Network: Cidr: 10.128.0.0/14 Host Prefix: 23 Cluster Network MTU: 8900 Migration: Mtu: Machine: To: 9000 Network: From: 1400 To: 8900 Network Type: OVNKubernetes Service Network: 172.30.0.0/16
Verify interfaces have correct MTU.
Note
Be sure to check all “master” nodes.
ssh core@host51 ip a | grep -e enp -e br-
Finalize the MTU migration. Be sure previous changes are complete.
Attention
This will cause each node to reboot via the machine config process. Be sure to let this process finish.
oc patch Network.operator.openshift.io cluster --type merge --patch \
  '{"spec": { "migration": null, "defaultNetwork":{ "ovnKubernetesConfig": { "mtu": 8900 }}}}'
Verify MCP has completed its changes via “watch”.
watch "oc get nodes; echo; oc get mcp"
Verify cluster MTU.
oc describe network.config cluster
OUTPUTStatus: Cluster Network: Cidr: 10.128.0.0/14 Host Prefix: 23 Cluster Network MTU: 8900 Network Type: OVNKubernetes Service Network: 172.30.0.0/16
SRIOV Unsupported NIC
Warning
Enabling an unsupported NICs is not officially.
Disable supported devices only checking.
oc patch sriovoperatorconfig default --type merge \
  -n openshift-sriov-network-operator \
  --patch '{ "spec": { "enableOperatorWebhook": false } }'
Enable “DEV_MODE” on the sriov subscription.
oc patch subscription sriov-network-operator -n openshift-sriov-network-operator \
  --type merge --patch '{"spec": {"config": {"env": [{"name": "DEV_MODE", "value": "TRUE"}]}}}'
After operator and config-daemon pods restart verify dev mode.
Check pods restart:
oc -n openshift-sriov-network-operator get pods
Verify dev mode:
oc -n openshift-sriov-network-operator logs -f -c sriov-network-config-daemon sriov-network-config-daemon-xxxxx
SRIOV and Primary MGMT/CNI
In some cases your node may only have one NIC with SRIOV capabilities. We need to use this NIC for the primary CNI but want to create VF’s for our CNF’s via the SRIOV operator.
Recover root passwd
Important
Tested on v4.14.x only.
Reboot the system. When the grub bootloader screen appears, use the UpArrow and DownArrow keys to stop the countdown timer.
Select the the boot OS and press “e” to edit.
On the line starting with “linux” add “rd.break” to the end of the line. Press
Ctrl-xto continue.At the “switch_root:/#” prompt, enter the
mount -o rw,remount
/sysroot
command to remount the system’s root as read/write.Now type
chroot /sysrootand hit enter. This will change you into the sysroot (/) directory, and make that your path for executing commands.Set root password with:
passwd root.Now
exitandreboot.Important
When rebooting be ready to interrupt the bootloader screen just as we did in step 1.
When the grub bootloader screen appears, use the UpArrow and DownArrow keys to stop the countdown timer.
Select the the boot OS and press “e” to edit.
On the line starting with “linux” add “autorelabel=1” to the end of the line. Press
Ctrl-xto continue.Warning
Upon boot the system will autorelabel and several warnings will appear. You can ignore these.
The system will reboot when autolabel completes.
Let the node reboot with normal command line switches.
On prompt try logging in with root and new passwd.
Update DNS via NMSTATE
With nmstate we can change the cluster deployed resolv.conf settings. Install the nmstate operator with defaults and inititialize the operator. Create the following policy yaml and apply to cluster.
apiVersion: nmstate.io/v1
kind: NodeNetworkConfigurationPolicy
metadata:
  name: dns-policy
spec:
  nodeSelector:
    node-role.kubernetes.io/master: ""
  desiredState:
    dns-resolver:
      config:
          search:
          - lab.local
          - test.local
          server:
          - 192.168.1.68
          - 192.168.1.53
Tech Preview
Pod Disruption Budget
Found this nice custom command to check PDB across the cluster and isolate potential issues.
oc get pdb -A -o custom-columns='NAMESPACE:metadata.namespace,NAME:metadata.name,MINAVAILABLE:spec.minAvailable,MAXUNAVIALABLE:spec.maxUnavailable,CURRHEALTHY:status.currentHealthy,DESIREDHEALTHY:status.desiredHealthy,EXPECTED:status.expectedPods,DISRUPTIONS:status.disruptionsAllowed' | \
awk 'NR==1; $8==0'
Quick App Deployment & Route
Create the new app
oc new-app --name httpd-1 --image mirror.lab.local:8443/ubi10/httpd-24:latest -n default
Expose the service
ClusterIP
Note
“new-app” automagically created the ClusterIP service. This command will create an OpenShift route.
oc expose service httpd-1 -n default
oc get routes -n default
NodePort
oc expose deployment httpd-1 --name httpd-1-nodeport --type NodePort -n default
oc get svc httpd-1-nodeport -o wide
LoadBalancer
oc expose deployment httpd-1 --name httpd-1-loadbalancer --type LoadBalancer -n default
oc get svc httpd-1-loadbalancer -o wide
Confirm app is running and responding
oc run curl -n default -it --rm --image mirror.lab.local:8443/curl/curl:latest -- /bin/sh
curl <service_IP>:8080
curl <service_Name>:8080
curl <external_IP>:8080
curl <node_IP>:NodePort
Manually Add VLANs
Created the following for loops to create, delete, and check several bonded vlan interfaces.
Note
Should be able to handle this with nmstate today (see example below). At the time, v4.12, it was defaulting to the wrong vlan flag “0” and nmstate could not change the setting. Manually building the vlans was the only option.
# Create vlan interfaces on two different bonds across several nodes

for i in {07..29}; do for j in {1..2}; do for k in {200..229}; \
  do ssh core@ims-$i sudo nmcli con add type vlan con-name bond$j.$k dev bond$j id $k \
  connection.interface-name bond$j.$k flags 1 ipv4.method disabled ipv6.method disabled; \
  done; done; done;

# Delete vlan interfaces

for i in {07..29}; do for j in {1..2}; do for k in {200..229}; \
  do ssh core@ims-$i sudo nmcli con delete bond$j.$k; \
  done; done; done;

# Count vlan interfaces for consistency

for i in {07..29}; do for j in {1..2}; \
  do echo ims-$i-bond$j && ssh core@ims-$i nmcli con sh | grep bond$j | wc -l; \
  done; done;
apiVersion: nmstate.io/v1
kind: NodeNetworkConfigurationPolicy
metadata:
  name: worker-nncp
spec:
  machineConfigPoolSelector:
    pools.operator.machineconfiguration.openshift.io/worker: ""
  nodeSelector:
    node-role.kubernetes.io/worker: ""
  desiredState:
    interfaces:
    - name: bond1
      type: bond
      state: up
      mtu: 9216
      copy-mac-from: ens1f0np0
      ipv4:
        dhcp: false
        enabled: false
      ipv6:
        dhcp: false
        enabled: false
      link-aggregation:
        mode: balance-rr
        options:
          miimon: '140'
        port:
        - ens1f0np0
        - ens1f1np1
    - name: bond1.200
      type: vlan
      state: up
      ipv4:
        dhcp: false
        enabled: false
      ipv6:
        dhcp: false
        enabled: false
      vlan:
        base-iface: bond1
        id: 200
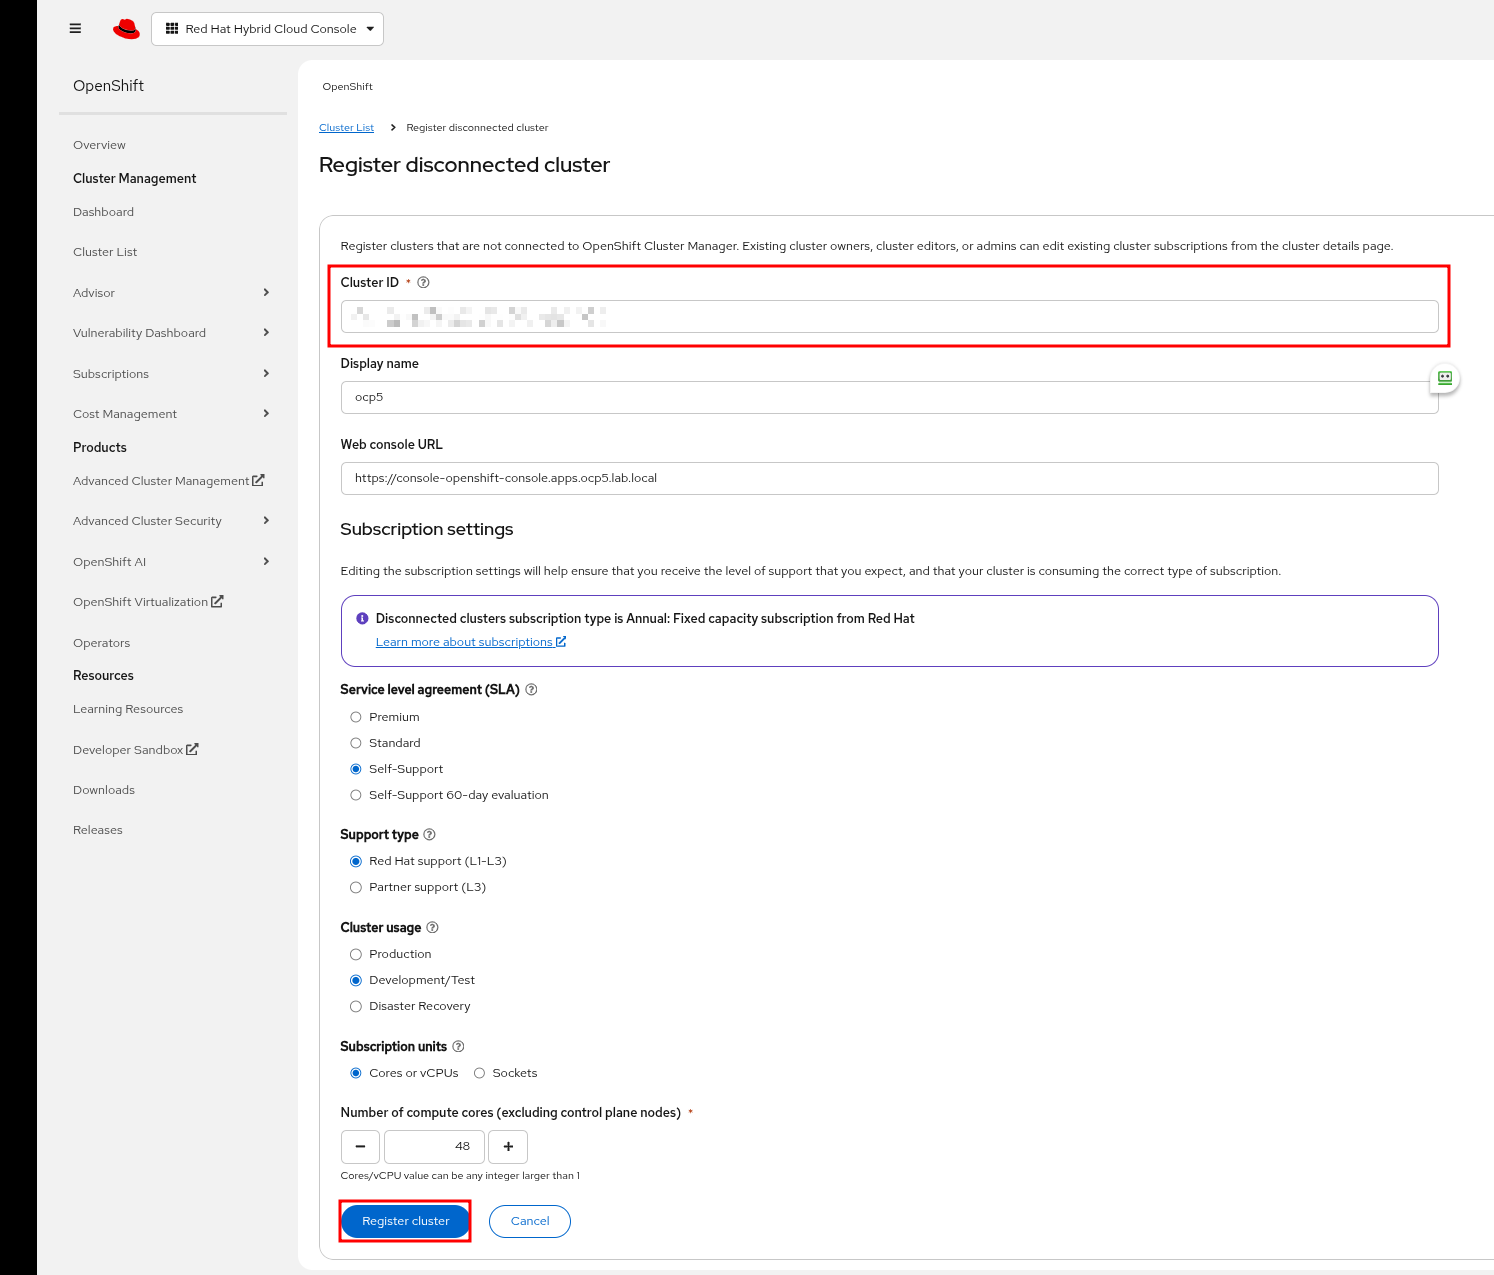
Register Cluster
Important
Be sure to have an Red Hat account with available OCP subs for support.
When building a disconnected cluster you’ll manually need to register your cluster for support.
Retrieve cluster-id
oc get clusterversion -o jsonpath='{.items[].spec.clusterID}{"\n"}'
Go to https://console.redhat.com/openshift
Click “Cluster List”
Click “Register cluster”
Fill in fields and click “Registery cluster”