Enable SR-IOV on RHEL/KVM
For lab purposed I purchased an old Intel I350 SRIOV capable card. The steps will guide you through configuring the VF’s and passing them to KVM.
Discover “Ethernet Controller”
sudo lspci -nn | grep -i 'Ethernet Controller'
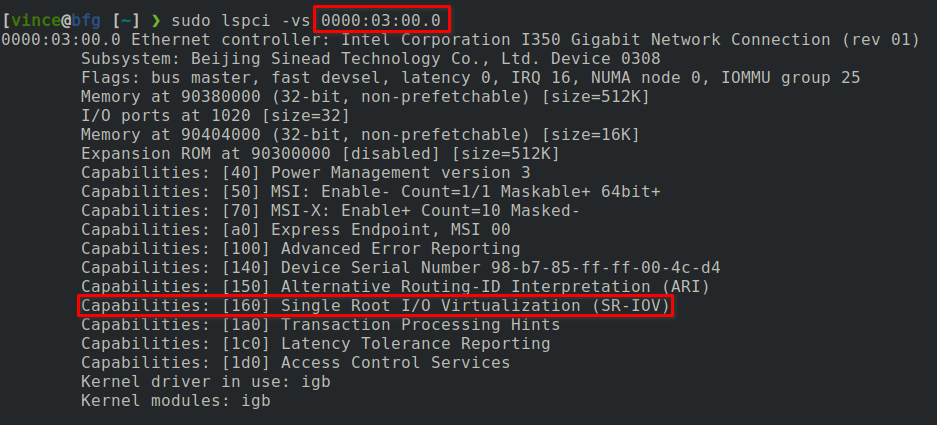
Discover hardware capabilities and confirm SRIOV support
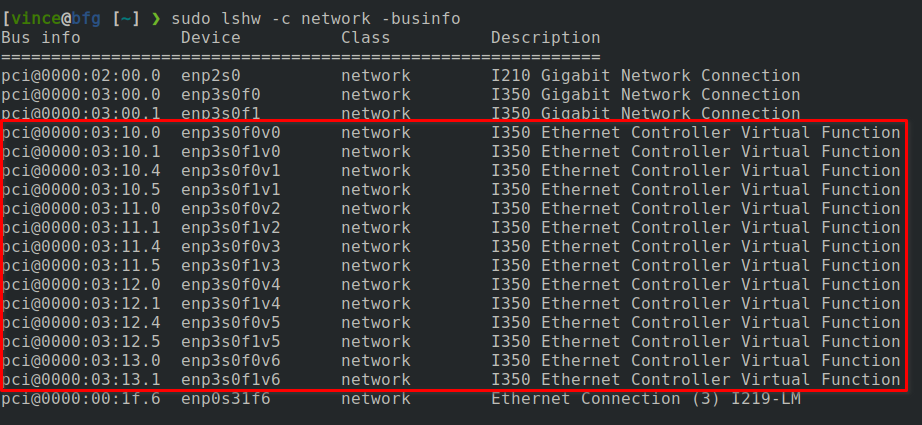
sudo lshw -c network -businfo

sudo lspci -vs 0000:03:00.0
Discover number of allowable VF’s for each interface.
cat /sys/class/net/enp3s0f0/device/sriov_totalvfs
cat /sys/class/net/enp3s0f1/device/sriov_totalvfs
Enable VF’s. In my case I have two interfaces and in the previous step I discoverd that each support up to 7 VF’s.
echo 7 | sudo tee /sys/class/net/enp3s0f0/device/sriov_numvfs
echo 7 | sudo tee /sys/class/net/enp3s0f1/device/sriov_numvfs
Attention
These changes will be lost upon reboot. Make them permanent by adding the lines to “/etc/rc.d/rc.local”. You can remove “sudo” from each line. Be sure to make “rc.local” executable.
Verify VF’s are available.
sudo lshw -c network -businfo
MAC addresses change between reboots. If needed you can configure a static MAC address for each VF. I used the previous information for the last three octets.
sudo ip link set enp3s0f0 vf 0 mac 52:54:00:03:10:00
sudo ip link set enp3s0f0 vf 1 mac 52:54:00:03:10:04
sudo ip link set enp3s0f0 vf 2 mac 52:54:00:03:11:00
sudo ip link set enp3s0f0 vf 3 mac 52:54:00:03:11:04
sudo ip link set enp3s0f0 vf 4 mac 52:54:00:03:12:00
sudo ip link set enp3s0f0 vf 5 mac 52:54:00:03:12:04
sudo ip link set enp3s0f0 vf 6 mac 52:54:00:03:13:00

sudo ip link set enp3s0f1 vf 0 mac 52:54:00:03:10:01
sudo ip link set enp3s0f1 vf 1 mac 52:54:00:03:10:05
sudo ip link set enp3s0f1 vf 2 mac 52:54:00:03:11:01
sudo ip link set enp3s0f1 vf 3 mac 52:54:00:03:11:05
sudo ip link set enp3s0f1 vf 4 mac 52:54:00:03:12:01
sudo ip link set enp3s0f1 vf 5 mac 52:54:00:03:12:05
sudo ip link set enp3s0f1 vf 6 mac 52:54:00:03:13:01
Attention
These changes will be lost upon reboot. Make them permanent by adding the lines to “/etc/rc.d/rc.local”. You can remove “sudo” from each line. Be sure to make “rc.local” executable.
Verify new MAC address’s
ip link show enp3s0f0
ip link show enp3s0f1
Update “/etc/rc.d/rc.local” (Optional)
echo 7 | tee /sys/class/net/enp3s0f0/device/sriov_numvfs
ip link set enp3s0f0 vf 0 mac 52:54:00:03:10:00
ip link set enp3s0f0 vf 1 mac 52:54:00:03:10:04
ip link set enp3s0f0 vf 2 mac 52:54:00:03:11:00
ip link set enp3s0f0 vf 3 mac 52:54:00:03:11:04
ip link set enp3s0f0 vf 4 mac 52:54:00:03:12:00
ip link set enp3s0f0 vf 5 mac 52:54:00:03:12:04
ip link set enp3s0f0 vf 6 mac 52:54:00:03:13:00

echo 7 | tee /sys/class/net/enp3s0f1/device/sriov_numvfs
ip link set enp3s0f1 vf 0 mac 52:54:00:03:10:01
ip link set enp3s0f1 vf 1 mac 52:54:00:03:10:05
ip link set enp3s0f1 vf 2 mac 52:54:00:03:11:01
ip link set enp3s0f1 vf 3 mac 52:54:00:03:11:05
ip link set enp3s0f1 vf 4 mac 52:54:00:03:12:01
ip link set enp3s0f1 vf 5 mac 52:54:00:03:12:05
ip link set enp3s0f1 vf 6 mac 52:54:00:03:13:01

echo 7 | tee /sys/class/net/ens6f0/device/sriov_numvfs
ip link set ens6f0 vf 0 mac 52:54:00:a6:10:00
ip link set ens6f0 vf 1 mac 52:54:00:a6:10:04
ip link set ens6f0 vf 2 mac 52:54:00:a6:11:00
ip link set ens6f0 vf 3 mac 52:54:00:a6:11:04
ip link set ens6f0 vf 4 mac 52:54:00:a6:12:00
ip link set ens6f0 vf 5 mac 52:54:00:a6:12:04
ip link set ens6f0 vf 6 mac 52:54:00:a6:13:00

echo 7 | tee /sys/class/net/ens6f1/device/sriov_numvfs
ip link set ens6f1 vf 0 mac 52:54:00:a6:10:01
ip link set ens6f1 vf 1 mac 52:54:00:a6:10:05
ip link set ens6f1 vf 2 mac 52:54:00:a6:11:01
ip link set ens6f1 vf 3 mac 52:54:00:a6:11:05
ip link set ens6f1 vf 4 mac 52:54:00:a6:12:01
ip link set ens6f1 vf 5 mac 52:54:00:a6:12:05
ip link set ens6f1 vf 6 mac 52:54:00:a6:13:01
Note
If the VF’s are NOT created, you may need to add “ixgbe.max_vfs=7” to the kernel command line options. Depending on your NIC this could be igb or ixgbe or whatever_driver.
The follow process walks through updating the host kernel: Configuring kernel command-line parameters
IOMMU “pass-through” may be required for better performance. The following Lenovo article https://lenovopress.lenovo.com/lp1467.pdf which goes into a pretty deep discussion of how IOMMU works in the Linux kernel, specifically there is a good write up on page 11 about pass-through vs translation mode.
sudo grubby --update-kernel=ALL --args="intel_iommu=on iommu=pt"
Validate change before and after reboot.
dmesg | grep "iommu: Default"
Important
For OCP VM instructions see Enable SR-IOV on OCP VM